Using btrfs snapshots
Yesterday, I spent the whole day fixing a huge mess in my computer, caused due
to circumstances I’ll elaborate on in a bit. Regardless, this all could have
been fixed easily if I made use of the snapshot feature provided by the btrfs
filesystem, which my device was (and is) using. I learned my lesson, and I
have decided to finally come out of hibernation to teach it to others.
So what happened yesterday?
I was watching some YouTube, when suddenly, the whole UI froze completely with the audio still playing. This wasn’t new to me; this is a known kernel bug related to AMD iGPUs, that is especially prevalent on KDE Plasma, which I was using at that time. It had hit my system a few times before too, but I hadn’t bothered actually working around it because that would mean disabling some AMD GPU features which I did not wish to do. So, like always… I just forced the computer off via the power key. It turned off succesfully, and I turned it on again to get back to it.
Lo and behold, the computer failed to boot up to the GUI. The bootup systemd
logs were weird; NetworkManager had failed to start for whatever reason and
instead of the logs clearing the way for SDDM like before, the screen just
got stuck there. After a bit of confusion, I got into a rescue shell and checked
the systemd journals… then I found this.
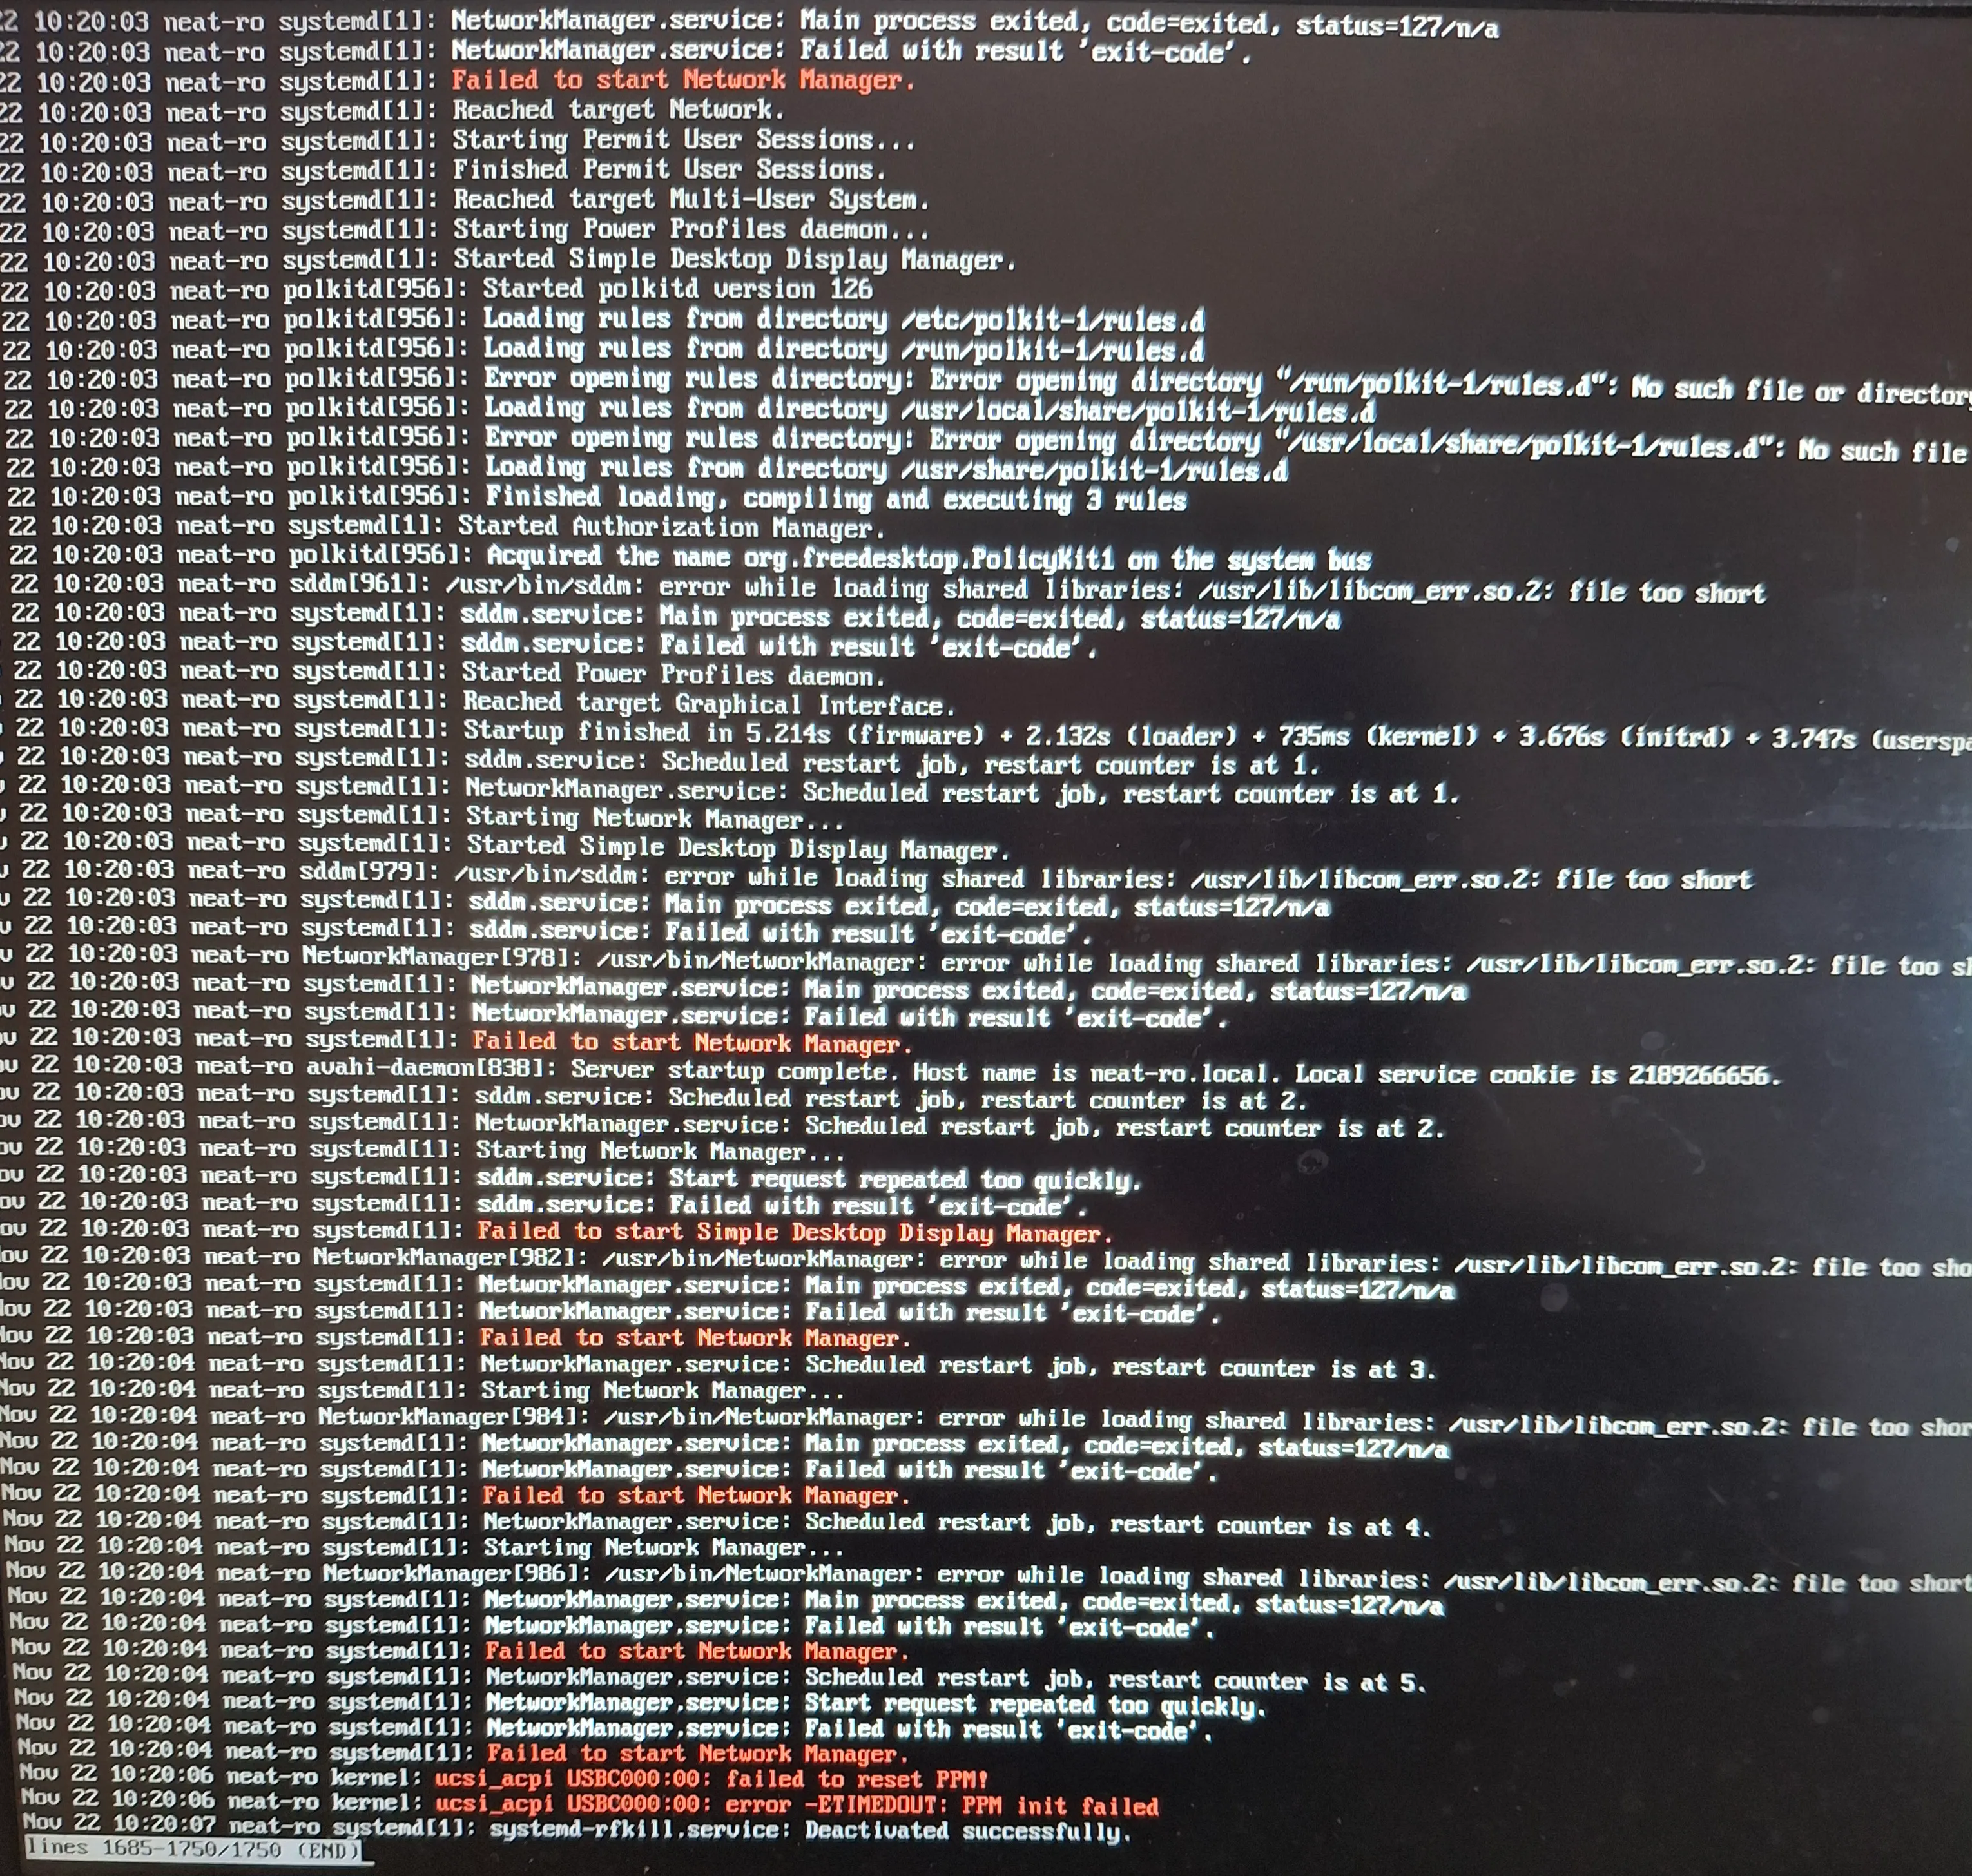
All those “file too short” errors you see with the libraries? Seems like that
force shutdown I did before corrupted a bunch of important libraries and
prevented the system from booting entirely. After some extra investigation it
turns out pacman was doing some updates when I did the shutdown, which might
have caused this, though I’m not sure how exactly.
Anyways, I desparately tried for the next few hours to fix this problem… to no avail. Eventually I just had to reinstall everything. Thankfully I had backed everything up so I didn’t lose much in terms of data, and I also decided to move to Hyprland for now; I already had a basic config ready beforehand and now after some extra quality-of-life tweaks to it, I’ve decided to stay with it for the time being.
How I could have fixed it easily
I mentioned btrfs before. It is one of the most popular filesystems being used on Linux systems nowadays. This is mainly because of a snazzy feature it has: snapshots. You can think of a filesystem snapshot as a git commit; each snapshot corresponds to a particular state of your filesystem, and you can revert to it whenever you want. This is a huge win for data protection in case of things getting all messed up like what happened to me.
I was using btrfs at that time… but the problem is, I wasn’t using snapshots at all. I didn’t even bother. This time though, I decided not to make the same mistake, and looked into how snapshots are done.
There are two programs used to set up snapshots that I know of: snapper
and btrbk. Looking into these, I found
this post by Herman Õunapuu,
that described why btrbk turns out to be better than snapper. While I’m new to
this and don’t understand it all too well, the basic gist is that btrbk is
generally better because it is easier to set up and more convinient in some
ways.
While Õunapuu also described how to set up btrbk in their post, said post
assumes you already know a bit about brtfs; so I’ll try to explain it as simply
as possible.
Firstly, check what subvolumes your system has:
sudo btrfs subvolume list /You should get an output similar to this:
ID 256 gen 1160 top level 5 path @
ID 257 gen 1161 top level 5 path @home
ID 258 gen 1145 top level 5 path @cache
ID 259 gen 1161 top level 5 path @log
Each of these are separate logical partitions in a single btrfs filesystem. They
are NOT separate partitions and don’t create separate block devices (as in those
devices like /dev/sda or /dev/nvme0n1 that represent storage devices). They
simply separate system data, home data, log data et cetera in one filesystem.
Now, based on what you have here, you need to create a config file for btrbk
to tell it how you want it to make snapshots. You can theoretically put this
config anywhere, but the ideal place for it is /etc/btrbk/. btrbk provides
a btrbk.conf.example there already with descriptions of various options and
some useful examples, however it is a bit dense so I’ll show what I personally
use, adapted from Õunapuu’s config.
timestamp_format        long

volume /
  snapshot_dir /btrbk_snapshots
  subvolume /
    snapshot_preserve_min   12h
    snapshot_preserve       24h
  subvolume /home
    snapshot_preserve_min   48h
    snapshot_preserve       7d
timestamp_format is used to determine the name of the created snapshot
subvolumes: for example, with the long format, a snapshot of /home will look
like home.20250825T1531.
volume / tells btrbk that our filesystem root is at /. Within it, we
elaborate further. We tell it to put the snapshots in a folder called
/btrbk_snapshots, but you can use any folder with any name you’d like. Within,
we now tell it which subvolumes we want to preserve.
This is where it gets a bit more complicated, with the difference between
snapshot_preserve_min and snapshot_preserve.
Take the /home subvolume.
snapshot_preserve_minis set to48h, which means that all snapshots from the last 48 hours are kept; no snapshot younger than 48 hours is ever deleted.snapshot_preserveis set to7d, which means that there is at least one snapshot for every day of a weekly schedule.
Imagine you made several snapshots every day for the past week. By the end of the week, what will happen is that all of those several snapshots you made over the last two days (last 48 hours) will stay there, and for each of the other days of the past week, there will be one representative snapshot.
Similarly, for the / subvolume in the config, this means that all snapshots
younger than 12 hours are preserved, and for each hour of the last day, there is
one representative snapshot.
You can modify these preservation settings as you wish, but this is good enough for me.
Now you’re ready to create a snapshot! To test if everything is working, try a dry run first. It will simply test if all the settings are OK and won’t actually touch anything.
sudo btrbk -c /etc/btrbk/btrbk.conf run --dry-run --progressIf everything is OK, create a snapshot by running
sudo btrbk -c /etc/btrbk/btrbk.conf run --progressYou should get an output that looks like this:
--------------------------------------------------------------------------------
Backup Summary (btrbk command line client, version 0.32.6)

    Date:   Sun Nov 23 21:41:29 2025
    Config: /etc/btrbk/btrbk.conf

Legend:
    ===  up-to-date subvolume (source snapshot)
    +++  created subvolume (source snapshot)
    ---  deleted subvolume
    ***  received subvolume (non-incremental)
    >>>  received subvolume (incremental)
--------------------------------------------------------------------------------
/
+++ /btrbk_snapshots/ROOT.20251123T2141

/home
+++ /btrbk_snapshots/home.20251123T2141
Automating it
It would get pretty annoying to have to manually snapshot things again and again,
and plus you could very well forget to do it. So, it is highly advised to set up
a timer service that will automatically set up snapshots for you. You can use
systemd timers for this purpose. If you don’t use systemd, well… you’re
probably capable enough to figure out timers for your specific system yourself.
If you are indeed using systemd, first create a system service to create
snapshots by creating a .service file in /etc/systemd/system; in my case I
made a file named /etc/systemd/system/btrbk-snapshot.service. It is a very
simple service that is like this:
[Unit]
Description=Run btrbk snapshots

[Service]
Type=oneshot
ExecStart=/usr/bin/btrbk -c /etc/btrbk/btrbk.conf run --progress
It is a basic service that simply executes the snapshot-taking command.
To make this timed, you have to create a corresponding timer service. Do this by
creating a corresponding .timer file with the same name as the .service file;
in my case I created /etc/systemd/system/btrbk-snapshot.timer. It looks like
this:
[Unit]
Description=Periodic btrbk snapshots

[Timer]
OnCalendar=*:0/30
Persistent=true

[Install]
WantedBy=timers.target
This timer sets the corresponding service, in our case the
btrbk-snapshot.service, to run on minute 0 and 30 of every hour, thus
creating a new snapshot every thirty minutes. The Persistent=true setting
is used to ensure that if the system was off or the timer missed during any
moment when the service should’ve run, the service will run immediately on
the next boot so that it can “catch up”.
To get this running, reload the systemd daemon and enable the service.
sudo systemctl daemon-reload
sudo systemctl enable --now btrbk-snapshot.service
Now you finally have some peace of mind, knowing you can always revert if your computer ever decides to corrupt all its libraries because of a forced reboot. Unless it corrupts the snapshots. I hope that’s not a thing.
Restoring backups
Fortunately, I haven’t had to restore a snapshot just yet. But someday, being a Linux user, I probably will, so I gotta know how.
Thankfully, the btrbk docs tell you how it’s done. The process is described
in detail here.
Basically, btrbk itself does not provide any restoration mechanism so you must
restore manually. The process is basically finding out which snapshot you want
to restore, create a read-write subvolume out of it and get rid of the old broken
subvolume.
I hope this was helpful!